Abstract
- Connecting the ROG Ally X to a TV is simple by means of an HDMI-to-USB-C cable or a dock.
- Docking suggestions: set sport decision, use FSR for higher efficiency, and join controllers.
- Setup as many settings as attainable earlier than you join the ROG Ally X to your show (like connecting a Bluetooth controller, for instance).
Probably the greatest issues about handhelds like Asus’ ROG Ally X and the Steam Deck OLED are how they let you join them to a tv or monitor. Whereas the method of connecting the Steam Deck may be very Swap-like and easy, issues get slightly extra sophisticated in terms of my ROG Ally X, provided that it is powered by Windows 11.
With that in thoughts, I’ve provide you with just a few suggestions and methods to streamline issues, together with simply connecting a controller, setting the decision, ensuring my dock is charging my ROG Ally X, and extra.

Associated
This $35 accessory turned my ROG Ally X into my main gaming device
Jsaux’s 6-in-1 Multifunctional Docking Station is likely one of the most full-featured, cost-effective handheld sport console docks accessible
1 Put money into a dock or a appropriate HDMI-to-USB-C cable
These adapters vary considerably by way of worth and options
If you wish to take the easy route, you possibly can join the ROG Ally X on to your TV or monitor with an HDMI-to-USB-C adapter. I really do that in my basement workplace after I need to play the hand held on my monitor, although the cable I exploit is USB-C-to-DisplayPort, which provides me entry to increased resolutions and refresh charges like 4K/120Hz.
This is similar cable I exploit to attach my M3 Professional Max MacBook Professional to my 144Hz-capable LG Ultragear 27GP950-B monitor, so it is already related to my monitor, making it very handy. That mentioned, as a result of I am not utilizing a dock, I additionally must plug a USB-C energy cable into the ROG Ally X (this implies I haven’t got any extra ports to attach a mouse and keyboard if I must, until I ditch Logitech’s dongle system and use Bluetooth). Given the hand held has two USB-C ports, that is very easy to do in comparison with the Steam Deck, which requires some type of USB-C dock or dongle to make this occur, because it solely has one USB-C port.

JSAUX 6-in-1 Multifunctional Docking Station
$35 $46 Save $11
So far as handheld docks go, the Jsaux 6-in-1 is likely one of the greatest on the market because of its HDMI 2.1 port, two USB-A ports, single USB-C port, Ethernet, and 100W energy passthrough.
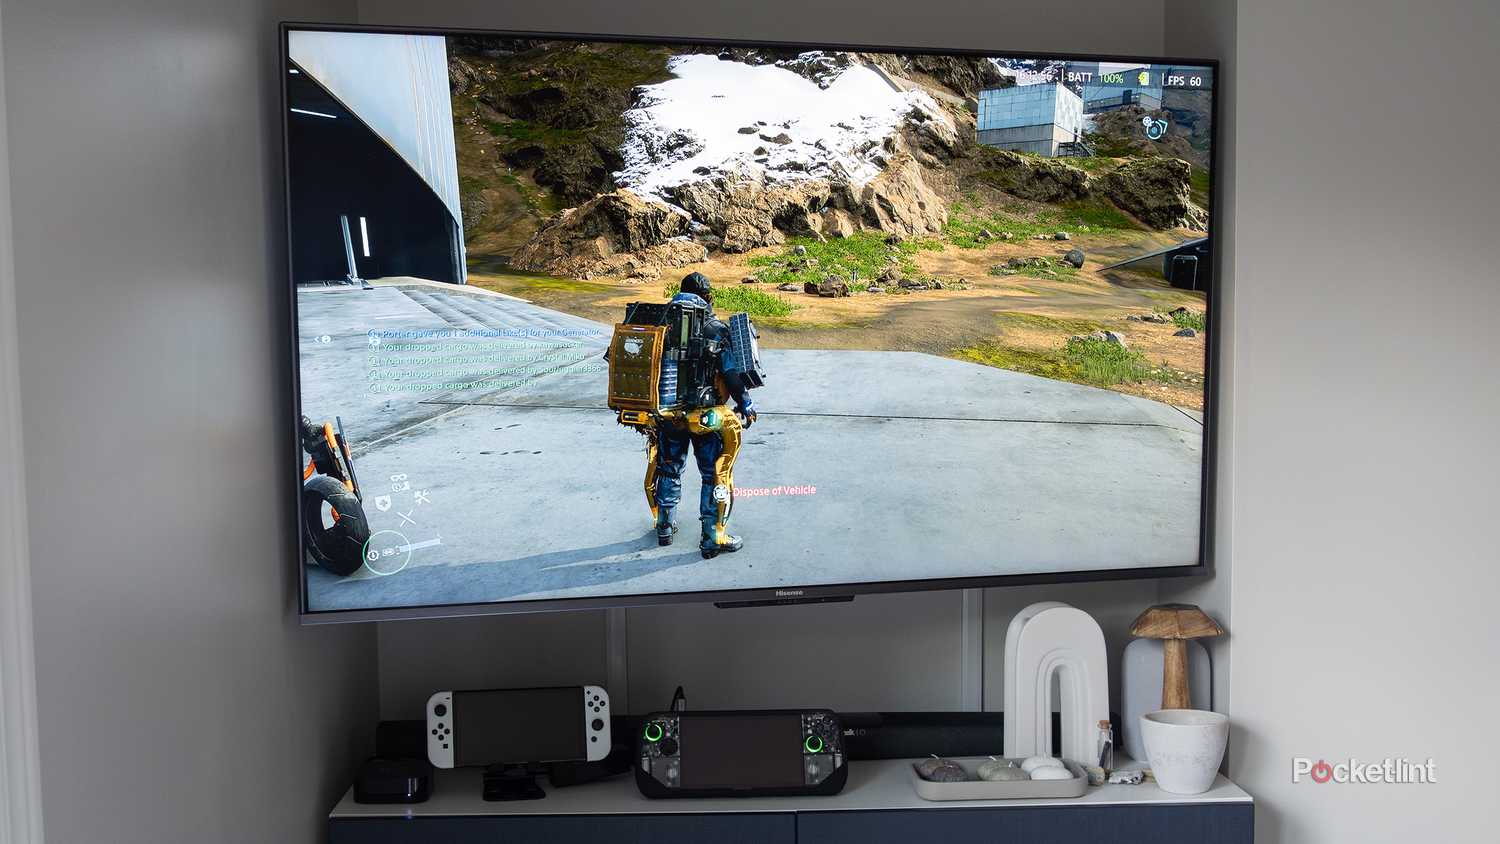
After I need to sport on the TV in my front room with my ROG Ally X, which is one thing I have been doing fairly typically these days as I work in direction of ending Death Stranding earlier than Death Stranding 2 releases in just a few months, I depend on Jsaux’s 6-in-1 Multifunctional Docking Station with its pass-through energy plugged into the ROG 140W USB-C GaN charger. In fact, I can accomplish the identical factor with the USB-C-to-DisplayPort cable I exploit in my workplace, however I admire the dock’s comfort because it’s at all times sitting there and able to go.
It additionally makes it straightforward to maneuver the ROG Ally X between my workplace monitor and my front room TV since I’ve two easy-to-access setups. As a bonus, utilizing the dock provides me entry to extra USB ports if I need to use my mouse or keyboard with my ROG Ally X, although I hardly ever do that in my front room.

Associated
The ROG Ally X is great, but the Steam Deck OLED easily beats it in 4 key ways
I just like the ROG Ally X, however in terms of on-the-go gaming, I discover myself turning to the Steam Deck OLED – here is why.
2 Observe these steps to attach your ROG Ally X to a show with a cable or dock
Try these easy step-by-step directions

Should you’re in search of easy directions, don’t fret, I’ve your again. It is a easy course of, however if you happen to’re unfamiliar with the wild world of cable adapters and docks, it might rapidly get complicated. Under are all of the steps you’ll want to take to attach your ROG Ally X to your TV or monitor:
- Plug your HDMI-to-USB-C cable into one of many ROG Ally X’s USB-C ports (if you wish to hold your ROG Ally X charged, be sure you have an influence cable plugged into its different port). Should you’re utilizing a dock, plug the video out USB-C cable into both of the ROG Ally X’s USB-C ports.
- Join the opposite finish of the HDMI cable to your TV or monitor. Should you’re utilizing a dock like Jsaux’s Multifuctional Docking Station, be sure you have your TV or monitor’s HDMI cable plugged into the proper enter.
- Should you’ve executed every thing appropriately, the ROG Ally X ought to robotically connect with your TV/monitor, and you will see the Home windows login display (the show on the ROG Ally X will usually flash as soon as earlier than transferring to your exterior monitor). In case you have a passcode or fingerprint set in your handheld, you may must kind that in (I typically undergo this step earlier than connecting the ROG Ally X to my show).
- Subsequent, faucet the Armory Crate SE button to launch the ROG Ally X’s unified person interface app. Now you can choose the sport you need to launch, and also you’re able to sport away on the large display.
In order for you 4K/120Hz output as an possibility, be sure you’re utilizing an HDMI 2.0 cable, or, like me in my basement workplace, an HDMI-to-DisplayPort cable. Additionally, make sure you’re plugging your HDMI 2.0 cable right into a 4K/120Hz appropriate HDMI 2.1 port in your TV. With my
Hisense U8H Mini-LED TV
, that is port three or 4.
To verify your TV is displaying at a better refresh charge, navigate to Settings, Show, after which Superior Settings in Home windows 11 in your ROG Ally X. Subsequent, choose the refresh charge you need (in my case, that is 120Hz).

Associated
I wasn’t expecting the ROG Ally X to outshine the Steam Deck quite this much
Each gaming handhelds have particular strengths and weaknesses, however usually, the ROG Ally X reigns supreme.
3 Tweak your settings and join a mouse or controller
Connecting the ROG Ally X to a show is simple — it is what comes after that may get annoying

Over the previous few months, there are some things I’ve famous about taking part in the ROG Ally X in docked mode. First off, generally it is smart to alter the decision in-game if you’re taking part in on an even bigger show. I usually simply stick to 1920 x 1080 pixel decision (1080p) since that is what most video games I play run moderately effectively at already in handheld mode, however if you happen to’re taking part in a much less intensive indie sport, you may need to kick issues as much as 4K with a better refresh charge (I do that with Tunic, for instance).
Talking of upper refresh charges, benefiting from AMD FidelityFX Tremendous Decision (FSR) can actually assist kick up the body charge in each handheld and in docked mode. For instance, I have been in a position to persistently get 60-70fps when taking part in Demise Stranding with graphics set to excessive and FSR on balanced. Should you spend time tweaking the settings, you actually can get unbelievable efficiency out of the ROG Ally X.
I usually join the controller and make these adjustments earlier than connecting my ROG Ally X to my TV, particularly if it is the primary time I am utilizing that controller with the hand held.
One other factor value noting is that the ROG Ally X’s touchscreen would not work when it is docked, so settings you’d usually entry that method require a mouse, a related controller, or so that you can use the hand held’s built-in controls, which possible will not work until you might have a extremely lengthy cable related to it. To get round this subject, I exploit an Xbox Sequence X gamepad with the ROG Ally X when the hand held remains to be in transportable mode. To make this occur, maintain down the small button on the facet of the highest of the controller, and navigate to Settings on the ROG Ally X. Subsequent, you may discover Bluetooth within the left bar. Choose Add Machine and your controller ought to save (different gamepads have the identical course of — you simply want to ensure they’re in syncing mode).
As soon as the controller is saved, the subsequent time you flip it on, it will robotically connect with the ROG Ally X. One other essential tip is to open the Command Middle with the button simply above the left d-pad and choose Disable Embedded Controller earlier than launching a sport. In my expertise, this forces most titles to default to your Bluetooth controls as an alternative of the ROG Ally X’s built-in buttons. I usually join the controller and make these adjustments earlier than connecting my ROG Ally X to my TV, particularly if it is the primary time I am utilizing that controller with the hand held.
Should you’re working into sound output points, faucet the speaker icon on the backside of Home windows 11’s menu and choose the
>
arrow beside the 2 dials. Right here you possibly can choose the ROG Ally X’s sound output. I’ve had to do that just a few occasions to make the hand held output sound correctly to my Hisense U8H Mini-LED TV.

Associated
4 reasons you don’t need a Switch 2 if you already own an ROG Ally X
Nintendo’s upcoming Swap 2 is spectacular, however if you happen to already personal Asus’ handheld, you most likely aren’t lacking a lot.
Trending Merchandise


CHONCHOW LED Keyboard and Mouse, 104 Keys Rai...


HP Notebook Laptop, 15.6″ HD Touchscree...


Wireless Keyboard and Mouse Combo, MARVO 2.4G...